The
operational
amplifier is the fundamental part of a great number of electronic
systems. It is used in small assemblies as well as in high technology devices. This text proposes a
way to apprehend its functioning.
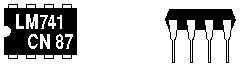
The most known opamp is the LM741. You can enter an electronics store
and buy one for 50 ¢. The picture below shows what it resembles,
magnified
three times. Each of the eight legs is a small electric wire :
This is how it is represented in electronic diagrams:
And here's how it is represented in the handbooks of the manufacturers :
The wire marked NC is used for nothing : NC means "Not Connected". The
wires marked "OFFSET NULL" are sometimes useful for precise adjustments.
Here follows an "image" of how an opamp works. We will consider that an
opamp
contains four things: two voltmeters, an adjustable power supply, and
a robot.
Four remarks about these four objects:
So that the adjustable power supply can output
current, it
is necessary the opamp is connected to a power source. You
can for example connect V+ to the positive pole of a 9 V battery, and
V-
to its negative pole (0 V).
The power supply is not very powerful. It will
not provide
huge electric outputs. At most a few tens of milliamperes. (Unless you
use a power opamp, of course.)
When the power supply is
tuned to the
maximum, it will output almost V+ (9 V). At the minimum, almost V- (0
V).
Between the two, any tension (1.3 V, 2 V, 4.73 V, 6.89 V...). The
adjustment of the power supply can adapt from the minimum to the
maximum in about one
millionth of a second.
The two voltmeters have the names "+"
and "-".
They are not rigorously completely identical, and one should not try to
make them measure tensions higher than V+, or lower than V-: they would
function badly, or could even burn.
What does the robot? It looks at the two voltmeters permanently, and
does this:
If the voltmeter "-" measures a
tension higher
than the voltmeter "+", then the robot decreases the tension the power
supply outputs.
If the voltmeter "-" measures a
tension smaller
than the voltmeter "+", then the robot increases the tension the power
supply outputs.
If the voltmeters measure the same,
the robot
changes nothing to the power supply tension.
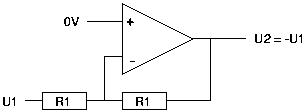
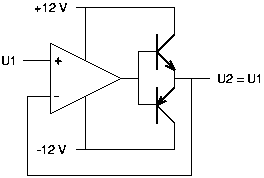
A practical example: the tension follower. One simply
connects the output of an opamp to its entry "-":
To understand the operation of the tension follower, ask yourself these
three questions:
If at the time one switches this circuit on, the
output produces 4.5 V, and U1 is worth 2 V, how will the opamp react?
Answer: the opamp will
have 4.5 V on its input "-", and 2 V on its input "+". As 4.5 is more
than 2, it
will lower the output voltage quickly. When the output
voltage passes by 2 V, there will be 2 V on the entry "-". Having the
same tension on the two entries, the opamp robot does not touch any
more to anything and keeps 2 V on the output. U2 = U1.
If suddenly the U1 signal
passes from 2 V
to 2.001 V, how will the opamp react?
Answer: the opamp will
have 2 V on its "-" input, and 2.001 V on its "+" input. As 2 is
smaller than 2.001,
it will increase the output voltage quickly. When the
output voltage passes by 2.001 V, there will be 2.001 V on the "-"
input. Having the same tension value on the two inputs, the opamp
leaves things like they are and keeps 2.001 V on its output. U2 = U1.
Imagine one connects the
output of the opamp
to an apparatus which is a strong consumer of current. Suddenly there
is a tension drop on the output of the opamp, from
2.001 V down to say 1.997 V. How will the opamp react?
Answer: the opamp will
have 1.997 V on its input "-", and 2.000 V on its input "+". As 1.997
is less
than 2.001, it will increase the output voltage quickly. When the
output voltage passes by 2.001 V, there will be 2.001 V on
the input "-". Having the same thing on the two inputs, the opamp
leaves things like they are and keeps 2.001 V on its exit. U2 = U1.
The tension follower is a very useful circuit: the U1 signal can
come from an apparatus very sensitive and delicate, the input "+" of
the opamp will not make him undergo any load. The output, on the other
hand,
can be connected to just anything. The opamp will fight as a cow-boy in
a
rodeo to guarantee that U2 will be a certified copy of U1. Within a
millionth of a second.
If you understand this picturesque view of an opamp,
you will be able to apprehend or conceive yourself 95% of the
electronic circuits using an opamp. For the 5% remaining, and for
courses in high school, you will rather have to use the idea that an
opamp is a machine used to make the following
formula true:
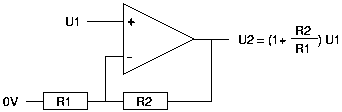
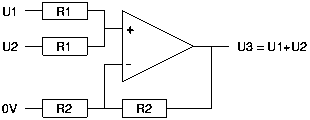
Now follow some general diagrams of applications of an opamp. You can
choose yourself the values of the resistors (or potentiometers).
Commonly, one uses values between 1 K and 100 K.
Consult the catalogues of the manufacturers to find operational
amplifiers with the characteristics or qualities you need: power,
speed,
precision, low energy consumption... You will also have to learn
sometimes, how to place condensators or "shock absorbers" so that an
opamp does its
work without running off the line. You will also have to take into
account the limits of each opamp: maximum speed, maximum
amplification, background noise, maximum or minimal tensions, technical
characteristics... Note a cheap opamp is sometimes easier to operate
and yields better results than an expensive one, because it is "calmer".
I recommend the LM386. Caution: the tension levels allowed on its
inputs and on its output are special. Closely read its
characteristics inside a data sheet before using it.
The diagrams below are relatively "academic". Do not
hesitate to adapt them. You can feed an opamp
with the output of another. You can use a separate battery for each
opamp.
You can short-circuit the outputs. To put it short: make things simple
and enjoy yourself. That way you will get a better understanding and
become more alert to the many precautions to be taken for the
realization of reliable circuits.